Showing posts with label cassius basaltic clay. Show all posts

Saturday, October 17, 2015

Florals for the Farmers Market

Yesterday evening in less than an hour I made up these four floral arrangements to take to the farmer's market today. This one has buddleia (butterfly bush), sumac and maple leaves. I've placed some wet floral foam, Oasis, in all but the taller vase to arrange the flowers and fillers. I cut the foam the size of the container and let the foam absorb water slowly then place wet foam in the container.

I decided to try using the cassius basaltic pieces I made many moons ago. The black clay pots have no glaze inside or out. Who knew several years later (2010) I'd learn these pots with the ebony clay are vitrified at cone 4 and hold water quite well. This arrangement has brown eyed susan, chocolate basil and potato vine. Oh there's some stevia in the back. I've filled it so full you can hardly see the round pinch pot.

This vase is a more recent one and I've put the salvia (pineapple sage), pine and gaillardia in backwards; too late now. Oh maybe not; I can lift out the foam and turn it around. Ha. the idea is to camouflage the floral foam from the observer.

While I was making the arrangements, all of a sudden I noticed I'd carried a large bumble bee into the kitchen. I scooped him up on a large flower, carried him outside, and gently let him attach to another flower in the garden.

Here's another arrangement placed in a taller pinched vase with curly rush and golden cone flowers. You'd be surprised at the arrangements you can make from plants and flowers in your yard. Even just leaves can make a pleasing display. Please give it a try. I'm off to the market; I hope to sell these pots with the arrangements in them. Thanks for reading and for all your comments.

Monday, August 23, 2010

Bathed In Sunlight


I'm calling this spirit jar, Bathed in Sunlight; it's about 15 inches tall. I've used yellow slip for the sun and also drizzled the slip run down the sides in columns. I inserted kanthal wire in the top for the sun's rays and put little beads at the end of each ray of the sun. In the photo it looks like there are twice as many wires and top beads due to the reflection. I couldn't move the piece for the photo because the yellow slip wasn't completely dry.


Here's a jar which I squeezed into a wavy form; it's about 11 inches tall. For the next week or so I'll be making sculptural pieces with my Cassius Basaltic clay.

Several folks requested information about Cassius Basaltic clay. It fires a rich black in the final fire. It shouldn't be fired any hotter than cone 4 to prevent blistering or bloating and little white specks coming to the surface. It does contain manganese so should be fired with proper ventilation. It also doesn't take well to glazes due to impurities in the clay, so I use it for sculptural pieces. This is supposedly the blackest firing clay available. I purchased this clay in California. It is distributed by Aardvark Clay in Los Angeles. Once I get a group of pieces made with this clay, I can fire them all together to the same temperature.

We've had severe thunderstorms and lots of lightening the last three days so I couldn't fire the kiln. Tomorrow is supposed to be a calm day, so I plan to start the kiln at noon and be done firing a little after midnight. I figured if I start firing midday when it's hottest outside, by the time the kiln is really hot it will be cooler outside and then by morning it will be cooled down. If I start firing late at night the kiln is the hottest in the morning and it has to cool down during the hottest part of the day.

I think there's a whole system to firing during the summer when a kiln is inside a garage connected to the house. Next place I'll have the kiln in a separate building away from the house. Coming up next some beach photos from the Forgotten Coast of Florida, you won't want to miss those. Comments and suggestions are welcome.

Sunday, August 22, 2010

Leaf Bottle and a Spider


Today I made this tall leaf bottle. It's about 16 inches tall and 3 by 4 inches wide, sort of oval in shape. I used cassius basaltic clay so it won't have a glaze, just the slipped leaves. Because this clay is so dark, it's messy and gets all over everything and is hard to clean up. But I still like it.


Earlier Gary came running in the house and said "Quick get your camera and come outside". I said, "Is it a turtle? He said, "No it's a big spider eating something behind the shed". Gary was pressure washing the shed. He lightly misted the spider and it climbed into a tree. When Gary was finished pressure washing the shed, the spider came back to his web. I think it might be a golden silk orb weaver. Comments and suggestions are welcome.

Tuesday, August 10, 2010

Mad Scientist


I was inspired to make some textured tiles with high contrast. I just love the contrast of two different clays used together. My original idea was to use contrasting slip on a dark clay body, trailing it or pouring it on the black tile. I didn't have any slip made up, so I made these.

I've used the cassius basaltic clay and some little loafers a local potter gave me to try. This probably isn't a good trial for the little loafers clay, but it was the only white clay I had. These tiles are about 7.25 inches square. When the tiles are fired the brown clay will turn a rich ebony black and hopefully will contrast nicely against the white clay.


Using two clays together isn't new for me, especially black and white clays. It's something I come back to often. I plan to leave the clay tiles natural without glaze. Now I'm wondering if I should coat them with a spray after they are fired so they can be dusted? What do you think? Have you used a sealer or spray on clay tiles used as a wall hanging? I guess more testing is necessary. Idea, test, idea, test, test, test.


I scribed a grid work on the back of the tile for better adhesion in case I decide to mount them on wood. Now I'm drying them, hoping they don't warp. I can't stack them due to the applied texture. How do you dry tile so the don't warp? Maybe I should use wallboard.

Then there's the firing - fire flat, or fire upright to help prevent warping? If I fire upright the applied texture might have a tendency to pop off. I'll probably fire them on a light dusting of sand. More testing needed.


Gary came into the studio to see what I was working on and he said, "What's the mad scientist working on this evening?" Wikipedia says, "Some mad scientists - and there are lots of them - are simply scientists who have become obsessively involved with their studies and so have begun to develop eccentricities beyond normal standards." I feel like a mad scientist with all my ideas and subsequent testing needed.

Thursday, December 3, 2009

Crazy for Clay

cassius basaltic clay pinch bowl, 4 x 9 inches

Quite by accident, one of my glazes formed a unique surface on a very black clay, cassius basaltic. I called the surface moon craters. Ever since then I've been thinking of how I could use the moon craters to advantage. I just couldn't get the unique surface out of my mind and really wanted to attempt to replicate the moon craters.

sketch for cassius basaltic pinch bowl

I planned on making a tall coiled vase based on a couple of drawings in my sketch book, but the piece I ended up making was a wide pinch bowl. Since I'm in a motorhome with limited space I decided to use the pinch bowl. For my sketch above, imagine the background being the black clay and the stripes and dots being white.

moon craters unique glaze surface (interior)

My sketch book is filling up with drawings for the cassius basaltic clay with moon craters and I have plans to make some tiles and groups of tiles. Of course I had to get some white clay for the stripes and will have to use that up too.


Not sure where I will store the greenware while it is drying. We have our three cats in the motorhome, so everything drying must be put some place they can't get to it. I just couldn't stop myself from getting a couple of bags of clay and trying a few of my ideas. I also have a few ware boards, my tool box, and glazes.

Texas white pinch bowl, 3 x 7 inches

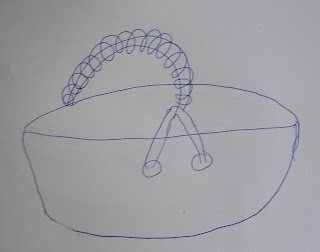
Here's another pinch bowl I made today with Texas white clay. I've never tried this clay before. After I made the bowl I thought it would look good with a handle across the top. I want to make the handle look like it's woven from reeds. I have a few more ideas about the handle.

sketch for handle on Texas white pinch bowl

We plan on leaving in about two more weeks, hopefully they'll be dry by then I can at least get them bisqued. Then perhaps I can find a place along the way to get them fired. What do you think, am I crazy for clay or what?

Friday, November 20, 2009

Moon Craters


Have you ever had clay go so completely wrong and think, I like it. Later do you think I can use this, and wonder if anyone else will like it? Do you throw the pieces away or say to yourself, so wrong and yet so right?


When I called the studio today to see if my pieces were fired, they said yes. Then they asked how did you get the dots on the inside? I said, oh those are slip I'll explain it when I get there. As I was driving up there I thought, Gee, I don't have any dots on the inside, only the outside. Could they have bled through? No, that wouldn't be possible. When I got there I walked up to the shelf and saw moon craters, perfectly formed moon craters. I love them, EXCEPT, I wish they were on the outside instead of the inside.


Many moons ago, I love that phrase and it sure works for this situation, I made several pieces with cassius basaltic clay with porcelain slip applied to the outside of some pieces. I was warned not to use the clay because it could be fickle. Then I was warned to only use it for sculpture and not functional pieces. Then I was warned the clay is subject to dunting and bloating and not to use glaze. Then I was warned that the slip would just fade out due to the dark color of the clay. Some of those warnings were correct. But the slip turned out just perfect, the clay did not dunt, but it did bloat right through the interior glaze, which gave me moon craters.


Did I listen? No. Do I ever listen when it comes to clay? Well maybe some of the time, but most of the time I want to try it for myself. I want to see what will happen. What do you think I am going to make next? Of course, a sculpture using cassius basaltic clay with moon craters on the outside and I think they will be so wonderful to see, to feel, to look at, to contrast with the black cassius basaltic clay.


So from now on if someone tells you not to try something with clay, please follow their advice and listen to them. But, of course you know I'm not going to listen to them, after all this is one of those times for the phrase do as I say, don't do as I do. I intend to make use of this clay and glaze mishap, a moon sculpture is in my future.

More work up next, some good, some not so good, so come back again and please make comments, I'd love to hear from you.

Saturday, July 12, 2008

The Clay Speaks Its Mind

new scroll bowl clay form using cassius basaltic clay
Sometimes the clay speaks it's mind and your hands just have to follow. I started out with a fairly large piece of cassius basaltic clay hoping to construct what I named a scroll bowl. Then a couple of things weren't working the way I wanted, so I modified my idea. After I made the bowl it was teetering so I knew I needed some feet. I put some small feet on it and it was still teetering. So I removed the small feet and made some longer feet. Since the feet are attached to the bottom and it is curved and am hoping they will stay attached. I'm anxious to see what happens as it dries.

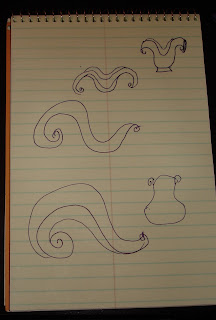
drawing for new clay form
When I get an idea to make something in clay, I make a quick drawing so I'll remember my idea. The scroll bowl idea popped into my head, so I drew some mockups. As you can see from my drawings, what I made in clay doesn't look anything like the concept I had. Does anyone else do this? Do you have an idea, draw a mock up and then make the piece and it doesn't turn out anything like you drew or imagined? Then do you like the new form, better than your original concept? I still want to try making the scroll bowl, maybe next time.

new clay form front view

Friday, July 11, 2008

Two Tea Cups

two greenware tea cups from Amaco tutorial
I was looking for some information on what size tea cups normally are and I came across the AMACO site and found they have several lesson plans posted. Here's two tea cups from one of their lesson plans I managed to make, in between going to a friend's house for lunch and getting all my watering and farm work done. I'm using the Cassius Basaltic clay again.

These tea cups looked like a good form to practice my hand building skills on. The cups are really green; the slip isn't even dry. I am hoping the cups will shrink some, they might be a bit too large for tea cups, but then again it depends on how much tea you like. They are comfortable to hold in both hands and I was thinking how nice it would be to hold a warm cup of tea in the cup when the weather turns cold.

I like the pedestal the cup sits on. I want to develop a pedestal to use with cups, soup bowls, serving bowls and maybe salad bowls. I realized when it came time to decorate the sides of the cups, I didn't have just the right sprig. I'll have to devote some time to making a few. So I rifled through the kitchen drawers and found a meat tenderizer mallet and used that. The mallet makes a nice impression in the clay.