Thursday, December 31, 2009

Happy New Year


While walking in a grassy field I saw a lone mushroom blooming, in a huge area by itself, not another one around. The lone mushroom reminded me I don't have to travel far to see or learn something new. And yet I'm about to set out on a long trip in my quest for a new place to live and set up my studio.

It's a big world and a small world too, so much to discover. I'm looking forward to the new year, an ending and a beginning. You all have, through your blogs, comments and encouragement, made the world very small and yet very big to me. I wish you all a very small and a very big and Happy New Year.

Tuesday, December 29, 2009

The Mysterious Sock


When we lived in the mountains near Foresthill every few months we would find a single sock in the front woods, but only one, never two. We'd find an argyle sock, an athletes sock, a wool sock, a cotton sock, a white sock, a black sock, a brown sock. Once we even found a bright orange sock. We tried to figure out how one sock was getting into our front woods but could never determine the reason.

At first we thought perhaps someone was camping in the woods and lost a sock. Then we thought a homeless person was walking by and dropped the sock. Later we thought some kids might be playing a joke on us and had thrown the sock out of their window. We examined the socks and they were always clean socks, not new, but clean, never dirty. And none of the socks belonged to us, not a single one. But we discounted all the reasons we could think of how the sock had arrived in the woods, because we found a single sock every few months over a period of almost nine years.

At first we saved the socks in a drawer thinking we might find the match to the single sock or we might need them for some reason. After a few years we had gathered quite a collection of single socks and decided to just toss the socks. After all none of the socks matched so we couldn't use them.

The week we moved I happened to walk up to the neighbors house across the street and up the hill to say good bye. When I got up the neighbor's house I saw my neighbor, Mac, was in the garage taking the laundry out of the dryer. I noticed my dog Blue had followed me up to Mac's house. As we were talking, Mac was folding clothes out of the dryer. A sock dropped out of the dryer and my dog Blue ran up to the dryer and quickly grabbed the sock and ran down the driveway with the sock.

I called and called Blue to come back, but she wouldn't listen. I was flabbergasted since Blue would always come back when I called and always listened to me. I told Mac about finding all the single socks in our yard over the years and never knowing how they got there or who they belonged to. Mac turned to me and said, "Blue is a really great dog, she listens to whatever I say. She'll fetch a ball and bring it back, but I've never been able to get her to bring back a sock".


The reason for the mysterious sock was finally solved after so many years. Above is a photo of Blue as a pup. If you'd like to read more about our dog Blue, please follow this link.

Saturday, December 26, 2009

Sad But Glad


Thai Pot by Linda Starr
pinched, 6 x 4.5 inches

This pinched pot reminds me of a Thai Temple. I even pinched the cover. The lid sits over the top of the pot. I need practice making lids and also learning how to get them to dry evenly. This is something I want to work on because the look of a pot can completely change with the addition of a different lid.

Recently Jeanette Manchester Harris blogged about some imitation gold luster she used in one of her bowls. I don't want to risk firing luster onto this pot because cassius basaltic clay can bloat and glazes can blister easily. That's where testing comes in, but right now I'm in my RV and am unable to do any testing. Perhaps I can try the imitation luster on this pot.


Scale Vase by Linda Starr
pinched, 4 x 5 inches

Here's another pinched pot made from overlapped round discs. I added green slip to emphasize the crevices. The next pot is one of the best I made so far out this clay, the most even and the thinnest. Practice makes perfect. Lastly to use up the clay I made a small dish to hold rings or change.


Flowing Stream by Linda Starr
pinched, 5.5 x 5.5 inches

Today's a sad but glad day. I've finally used up all the clay I have, so the pots I've shown you today mark the last of the clay making for now. I hope to make sure all the pieces are very dry and at least have them bisque fired before we set out on our travels.


Ring Dish by Linda Starr
pinched, 1 x 5 x 3.5 inches

Sad because no clay making for me for a while, but glad because we'll soon be starting out in our RV in search of a new place to live. Sad because just when I am really getting the feel of these two clays I have to give them up for a while. Glad because I see each new piece I make from clay has the potential to teach me something new about clay.

Please come back soon to see how my work over the least month does during firing, and to see where our travels take us.

Wednesday, December 23, 2009

Happy Holidays


Snowflake Bowl by Linda Starr
slab built, 1 x 6 x 5 in inches

Years ago I remember reading no two snowflakes are alike. To me snowflakes symbolize the imagination. So with that thought in mind, I'm sending you, all my blogging friends, blog readers, and lurkers an imaginary snowflake for the holidays. Hope you can imagine your own special snowflake floating through the air from me to you.


Chocolate Snowflake Bowl by Linda Starr
slab built, 1 x 6 x 5 in inches

Since we're in our RV we won't have a tree, especially since three cats would wreck havoc with the ornaments. Besides, lots of clay pieces are clogging all our storage space and we don't have much room to move till I get it fired. Here's a link for you to see my tree from last year. Happy holidays.

Monday, December 21, 2009

Coiling, Pinching, Rolling

White Feather Vase by Linda Starr
coiled, 11.5 x 5 inches

I'm hurrying to use all the clay in my RV so I can get them fired before we leave on our travels. I'm coiling, pinching, and rolling the clay into forms which will fit in the upper RV cabinets. I wish I'd smoothed the coils more for the feather vase, but it dried quicker than I expected so I was left with the undulating shape to apply the white feather.

Jar by Linda Starr
pinched, 7.5 x 4 inches

For this jar I pinched the bottom half and pinched a top half and put the two together. Then I cut the top off and fashioned a lid. This cassius basaltic clay is so wonderful to work with. It stays moist for a long time and doesn't dry out easily while I am working with it.

Egret by Linda Starr
slab built plaque, 9 x 9 inches

I made this small egret plaque because I am unable to make something really large now due to space limitations in my RV. I have a plan to make a large three piece wall hanging with a blue heron.

Basket by Linda Starr
slab built, 5.5 x 10.5 x 8.5 inches

This basket is a repeat for the one I did the other day out of the Texas white clay. As I mentioned in my last post this was much easier to make since I was familiar with the form. I hope to have a stainless or copper wire handle for this basket.

Happy holidays to you and your families and loved ones. Comments and suggestions are welcome.

Saturday, December 19, 2009

Goblets & Turkey Marsala

Aperitif Goblets by Linda Starr
pinched, 5 x 2.75 inches

Making smaller pieces in clay is just as challenging as making large pieces, and it's just as fun. I'm using up the last bit of Texas white clay I have and decided to make some smaller goblets with a wavy stems. I can see this size used as an aperitif or a dessert wine.

Roundel Goblets by Linda Starr
pinched, 5.5 x 4.25 inches

Are you ever confused on the meaning of a word? Originally I was calling these goblets rondel, but when I looked up the name I found that rondel can means many things. A rondel can be a type of medieval daggar, a short poem of 14 lines, a round piece of steel in armour to protect a vulnerable body part and several others. I just wanted to refer to the round doughnut shaped pieces of the stem. Then I saw the word roundel (with a u) means a round coat of arms which is what I thought the first spelling meant.

Speaking of meanings, do you use Wikipedia? I use it a lot for all kinds of research. I love learning and knowledge. Wikipedia operates free as a non commercial and non profit and are requesting donations to stay afloat. I really feel this is a worthy cause, the cause of knowledge for everyone. I wonder how much a set of encyclopedias would cost? The thing about the Internet is that a site like Wikipedia is always up to date unlike a book. I am not connected in any way to Wikipedia other than the fact that I use it all the time. Click on the link which will take you to the explanation by the founder and a way to donate if you wish.


Since we're in our RV we are occasionally using paper plates so the turkey Marsala isn't as pretty as it would be on a beautiful ceramic plate. Turkey Marsala is very easy to make, anyone can do it and it's the Marsala wine that gives the slightly sweet and distinctive flavor. Take thin turkey cutlets and dredge well in flour and set aside. Put some olive oil and a little butter in a large non stick frying pan and heat till warm. Add in about 1/2 pound of thickly sliced mushrooms and saute till lightly soft but not falling apart. Scoop out the mushroom and set aside in a bowl. Add the turkey cutlets and saute on each side till brown. Leave cutlets in frying pan and sprinkle the cooked mushrooms over the top. Turn up the heat for a minute when it's all sizzling, pour in half a cup of Marsala wine and let it sizzle to cook off the alcohol, then turn down the heat to low, cover, and cook till a fork inserted into the turkey goes in easily. Serve with some brown rice and vegetable of your choice.


Look at the upper right corner of this photo to see who is keeping me company while I make my ceramic pieces in my RV. That's Butter one of my cats. I'm sitting at the dinette booth and have a plastic bin for my cats to sit on the bench so they can lie there and see out the window easily. I usually have a bowl of water I rinse my sea sponge in and then throw the water outside so I don't clog the RV pipes with clay. The cats keep trying to drink the clay water. There must be a mineral in the clay they like.

Have a good weekend and I'll see you next week with a few more pieces I've made to use up the black cassius basaltic clay. Comments, suggestions, even critiques are welcome.

Thursday, December 17, 2009

Basket in Process


Basket in Process by Linda Starr
slab built, 5.5 x 10.5 x 8.5 inches

Sometimes my ceramics pieces evolve as I go along. This basket is what I ended up with today. Originally I intended to make a boat shaped piece with a foot but I just couldn't figure out how to make a template in the shape I wanted, so I made this basket form. Perhaps I need to get a book on origami and that might help me with my templates.


I pinched the sides and the middle flopped in a wavy pattern so I decided to enhance that feature. I'm traveling in my RV and the closest thing I could grab to prop up the side were a few bananas so that's what I used. Later I found soup cans worked better to hold the sides.


After I made the basket I thought about a handle. At first I was going to have a handle on a diagonal across the sides. Somehow that didn't look quite right. Then I decided to make a handle across the middle meeting at the section leaning to the middle. I didn't like that either. So those two handles were recycled.


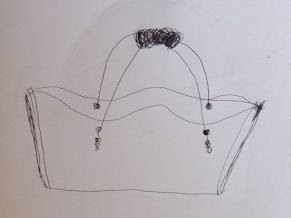
I decided to try sketching a metal handle I had in my mind. I wanted the metal wire to crisscross across the top. I also want some metal wound around the two handles at the top center. I'm picturing that black metal about the diameter of a clothes hanger. What do you think? Can you picture this type of metal handle on this piece? I drilled four holes to insert the wire through after the piece is fired.


Then I thought about how I would glaze the piece. For some reason a worn surface came to my mind. I decided to paint in a few lines of green slip like a basket weave that had worn away. I painted in a some dots along the edges like there are buttons or rivets holding the basket together.

I want to make a few more of these baskets. This form is fun to make, especially now that I've made one. The first one is always the hardest to make. After that each one gets easier. Please come back again in a day or two, I'd like to show you more goblets and a tall vase I made. Comments and suggestions are welcome.

Wednesday, December 16, 2009

Seafood Udong


Who could resist this soup with prawns, crab, fish cakes, vegetables and udong noodles. The seafood udong from a local restaurant is not only satisfying to the palette but just the right choice during cold and rainy winter weather. The pink and white half circles look like large radishes but they are fish cakes. I think udong refers to the type of noodles in the soup.


Gary was rather mortified I was taking photos of my food before I ate it, but it was so colorful and nicely presented I just had to share it with you. As I picked up the soup spoon I thought ... gee I could make one of these spoons in clay. I know by this time you must be shaking your head knowing I see clay pieces everywhere I go. Pinching bowls and spoons doesn't take up much room. I can easily set up a board on the RV table. I notice in the photo one of the spoons could use more smoothing on the handle. I wonder if I made these spoons large enough. I haven't used this Texas white clay before and don't know the shrinkage rate.


The crunchy eel roll would look better on a dark background plate I think. Although the leaves are a nice touch. The plate is made by Corelle. The soup bowl was a heavy ceramic one though. I figured I might as well make a couple of small sushi dishes to go with the small soup bowls. Sorry about the quality of the photos. My RV lighting isn't the best for taking photos of my clay greenware. The overhead cabinets in the RV are filling up with pieces drying. I'm going to have to rearrange a few things around here.


With the colder weather here our thoughts are turning to warmer climates. Last night we were looking at the Florida tour book. Gary has arthritis in one of his thumbs from an old dirt bike accident and my back has mild arthritis. Don't they say warm climates are better for arthritis?

Many years ago Gary's father had a little hole-in-the-wall bar in West Palm Beach right across from the beach and his last few years he said he wished he was living there again. Boy it would be nice to have that real estate now, wouldn't it. Gary was just a toddler when his family lived there and can only remember bits and pieces of that time. I heard somewhere Florida has a good ceramics college? Wonder where it's located; Florida is a big state. I'm off to see how my greenware is drying. It won't be long before we'll be on our way and who knows where we'll end up.

Monday, December 14, 2009

Goblets and Compotes


The other day as we unceremoniously drank wine out of plastic cups, Gary said, "Why don't you make some goblets for us to drink our wine from?" Since then I've been thinking of what wine would look like in a ceramic goblet. I wanted the drinking portion to be wide enough to enjoy the color of the wine, especially red wines.


Gary says you can tell a good red wine by it's color. This blended red wine from EOS Estate Winery in Paso Robles called Novella Synergy has the correct color and it's really good. Don't take Gary's or my word for it see what the Budget Vino has to say about it. The color is a clear ruby red, just beautiful. Doesn't the lady on the label look like she should be lounging in a bedouin tent near the Euphrates.


Last night I tried pinching some goblets. I made the two wide ones first and when I looked at them I decided they look more like compotes perfect for some plum pudding. So I tried one more to see how it fared. The taller one looks more like the shape I had in mind. I pinched the tops and then I pinched the bottoms. I let the two pieces harden up and then I attached them in the middle. I am letting them dry top side down since that is the heavier section and I don't want the bottom section to sag. I had fun making these and I plan to make some more, refining the shape and embellishing them.


After I made the goblet and compotes I wondered how I would sign my name. I decided to impress my signature stamp into the base of them. After I put the goblet and compotes together I realized I could have signed my name under the cup. Or if I made a plate base could sign my name there. My bases are open at the bottom. I'm wondering if I should make my goblets with another methods. I'm teaching myself as I go along. How do you make goblets?


Almost a year ago I talked about signing pots. At the time I asked for advice about my signature stamp examples.Lori of Fine Mess Pottery was asking about the "L" with the star in it at the top of my blog banner the other day. That's the signature stamp I decided on - an "L" with a star and I had a stamp made. Here are some quick holiday ornaments I made and I stamped my signature on the reverse side. Don't they look like holiday cookies? For most of my ceramics I sign the piece and also use the stamp. For smaller items or pendants I just use the stamp. You can see my signature stamp lying next to the slip container in the second photo. Do you sign your name or use a signature stamp or both?


I'm browsing a wonderful book from the library, Ceramics from Islamic Lands. There are so many color plates in this book I thought it must have cost a fortune and the price is $39.95. Of course the price to me was my tax dollars supporting the library. The history of ceramics, glazes, and techniques from this part of the globe is outlined in detail in the book.


We needed a water pump in our RV and had that installed yesterday by a shadetree mechanic. The water pump is the one that pumps fresh water to our toilet and kitchen sink in the RV. This week we have a couple of dental appointments and then we'll be off on our traveling spree hopefully to warmer climates. Come back again soon for more RV and clay adventures.

Thursday, December 10, 2009

Serious and Silly


When I'm inspired to make something in clay it's really serious to me. By serious I mean I've had an artistic feeling or vision or inspiration I am working out in the clay. Perhaps you recall the moon craters I am trying to recreate in this pinched bowl. I changed the design for the slip and glaze application for this pinch bowl and I applied the slip today.

The photo is taken facing down, but the bowl opens out like a large trumpet, so when it is sitting on a table the inside can be seen easily from a sitting position. When I fire the piece in the final firing I will apply the glaze in either four triangles or four bands in the same direction as the slip. It's hard to picture what it will look like in my mind's eye because my sketches are on white paper and the background color of the clay is dark and will fire black. I'll leave plain clay between the glazed sections as contrast. I really hope the glaze will bubble up again and make the same raised dots. If this works out I'll be really happy.


This is a flat coiled bowl, front and reverse, I applied slip to today. I'm not sure I like the way the slip looks. It's supposed to be mountains and in my mind I wanted the slip to be solid white and contrast with the black clay. I've set the piece aside to think about it for a while. I can always paint more slip and make it more solid or scrape it all off and start over again.


These are the two hump mold bowls I made last week. They finally dried enough to apply the slip. Originally I was going to fill the inside of the bowl with leaves and have a cat peaking through the leaves like the photo I took of Bones from my RV. I could only find my blue, green and black mason stains, so I was limited to those colors and decided to wait on the cat peaking from behind the leaves.

The previous pieces are what I call my serious pieces and these two are the silly ones. I have another couple of sketches I was going to use for these two plates, but again the color of slip I wanted to use I couldn't find. Also for some reason I wasn't in the mood to draw something serious on these plates. I have lots of these cat drawings in my sketch book. The cats are doodles I draw all the time. I decided to try a couple of my cat sketches on these plates with black colored slip.

My ink and pencil sketches are much better than my slip sketches. I wish the lines were thinner and more like my sketch book drawings. I need a thinner paint brush or thinner slip or perhaps just stain and water. I also need a lot more practice. For some reason I thought it would be fun to make something silly with clay. I think I need to push myself to let more silly into my life to balance out the serious. What do you think? Do you make things in clay just for the humor or fun of it? Gary said he liked my bowls much better than the plates. I guess that's his polite way of saying he doesn't like my cats. He hasn't seen the moon crater bowl or the mountain bowl I'll see what he says when he gets back this evening.

Monday, December 7, 2009

What Is It


Open Vase by Linda Starr
handbuilt cassius basaltic clay, 6 x 2 inches

Do you ever sketch something and think to yourself, that's not possible to make. Well that's what I did for this piece. I've been thinking, "How in the heck am I going to get the strips of clay to stand upright and attach the curved piece with only two hands?"


Sketch for Open Vase by Linda Starr

Here's the sketch I did a few months ago but never tried to make the piece till yesterday. I love a challenge so I decided to try it and so far it's holding together. I'm calling it an open vase. What do you think? Have any other good names for it? In my mind I was thinking it would be good for dried flowers. This piece is a little rough around the edges, but now that I know I can make it, I'll make more and perfect the design. I want to make it taller maybe about 12 to 15 inches and flare out the top. I showed it to Gary and he said it could be a toothbrush holder, a match holder, a candle holder, maybe it's just a sculpture.


Casserole Dish by Linda Starr
pinched Texas white clay, 4 x 9 inches

Here are the handles I decided to put on the pinched casserole dish. Rather than a handle over the top I decided the two side handles would let the dish be more useful in the kitchen. The dish is kind of heavy so I curved the handles down so the fingers can get a good grip underneath.


Coil Pot by Linda Starr
flat coiled cassius basaltic clay, 8 x 8 inches

For this vase I used the flat coiled method which I have always wanted to try. After I built the vase I hammered the sides with a metal spoon and held a dry sponge on the inside to support the sides. I also smoothed the sides with the back of a spoon. Once I did all the smoothing, the sides were too flimsy to even move the vase and I wondered how I could smooth out the base.


Luckily I am reading a book by Susan Peterson about traditional Acoma pottery by Lucy M Lewis and I learned how how Lucy Lewis used different sized huditzi to support the bottom of her pots. Think of the huditzi as a curved saucer. Eastern pueblos call the saucers puki. Since I'd like to continue making coiled pots, I'll need to make some huditzi. Lucy Lewis is known for her black on white decorative pots. For my pot I plan on decorating it with white. I am still thinking about the design for this pot.


bottom of hump mold plates by Linda Starr

Here are the hump mold plates I made the other day. Now that they've firmed up a bit I turned them over to see how the insides looked and to gently smooth the edges. I put them back on the molds though as I don't want the sides to droop out flat. Diane of Living River North was asking me if I picture food in functional ware while I'm making it. Sometimes I do and sometimes I don't, but for these bowls I was thinking they would look good with a salad in them with the edges or rim of the bowl left showing a bit. What about you, do you think about what the food will look like in a pot you are making for the kitchen? Oh check out Diane's blog for some great recipes and she recommended a wonderful book called Pots in the Kitchen by Josie Walters. I may just have to get myself an early Christmas present.


inside of hump mold plates by Linda Starr

Day before yesterday I started to develop a sore throat and a runny nose. I was afraid it would turn into the flu. I took one of the Wellness Formula and today I am much better. I am not a doctor and I don't have stock in this company (but maybe I should) but these herbal pills work wonders. Take one the minute you think you aren't feeling quite right and you will get well much quicker. they are a mega dose of vitamins, garlic and a few herbs to boost your immune system. The small bottle is rather expensive at about one dollar a pill, but I trip to the doctor with the copay or deductible would be much more than the cost of the bottle so I figure it is well worth it.


Normally in California all our rain comes in the winter and we've had a long dry spell. We're supposed to be entering a wet pattern and I am really enjoying the rain today. I guess I'll have bowl of cereal and some orange juice and make some more pots.

Friday, December 4, 2009

Easy Hump Mold

Red Textured Bowl by Linda Starr
slab built, 1.25 x 6 inches, cone 10 reduction

Several years ago I made this red bowl with an easy hump mold. I used half and half clay, textured the slab, and scalloped the edges.


I decided to try using paper bowls as my hump mold and here's what I did. I started with an ordinary paper bowl and cut off the rim. I used two paper bowls placed together to make the hump mold more sturdy. Turn the paper bowl upside down and that's your hump mold. Set the mold aside while you prepare your clay.


Today I am using Texas white which is a cone 5 clay. For this size bowl, I started with a three by three inch squared block of clay. You can put a rice bag underneath the paper plate hump mold if it starts to sag when you place the slab of clay over the mold.


Start slapping the 3 x 3 inch block of clay between your hands. Slap the clay on one side and then slap it on the other, flipping it over between your two palms and rotating it around. Slap the clay till it's about half an inch thick. Don't be shy, slap away. The clay and ultimately your bowl will be much happier in the end if you slap and compress the clay at this point.


Next put the slapped clay down on your rolling surface and start to roll the clay with a rolling pin. Rolling the clay on a smooth sheet of cotton material works well because you can move the clay around easily without it sticking to the bottom surface. Flip the clay over and rotate the clay every three or four rolls of the rolling pin. This is very important. The flipping and rotating of the clay helps to prevent warping of the finished bowl. I rolled my clay about three eighths of an inch thick.


Let the slab of clay firm just a bit. At this point you can texture the slab of clay if you wish. Gently move the slab and drape it over the paper bowl mold. Try not to stretch the clay or leave any finger prints in the clay while you center the slab of clay over the hump mold. You can let the sides droop flat for a wide rim or cut them off even with the bottom. Trim the excess from around the edges and smooth the edges with a damp sea sponge. Reserve the trimmed portions for the foot of the bowl.


Take the trimmed pieces and squish the clay together really well in the palm of your hand and roll it round in a ball. Flatten the ball and form it into a round flat piece. If the edges get dry and cracked moisten them with a sea sponge lightly and smooth. You can make the foot large or small. Each time I make a bowl I like to experiment with several different foot shapes and sizes.


Cut the center out of the round and smooth the inside and out side. Lay the round on the bottom of the bowl and mark the inside and outside.


Set the round aside and score the bottom of the round and the outlined portion of the bowl. Next sign your name in the center of the foot before you attach it. It's easier to sign without the foot on the bowl. Slip both the bowl and the foot well and attach the foot by pressing firmly and gently sliding it back and forth ever so slightly. The sliding assures a firm attachment of the foot to the bowl.


Notice the bowl with the foot below and the bowl where I pictured the trimming above are two different shapes along the edges. For the bowl below I left the edges more asymmetrical. That's one of the many reasons I like hand building and slab building with clay. Each handmade piece of pottery is little different than the next which makes it unique.


Cover the bowl lightly with plastic and leave upside down until it is completely dry and then turn over and fire according to your preference. Hopefully someone who likes to hand build can benefit from my description. You're welcome to copy my process, but please give me credit by referencing back to my blog. Comments and questions are welcome, thanks.