Showing posts with label Diana Fayt. Show all posts

Friday, October 17, 2014

Surface Patterns & Molds

For the next six weeks I'm taking Surface Patterns and Molds on online Ecourse with Diana Fayt. I hope to make hump molds to use in my clay making. I figure with a mold I can make a collection of uniform sizes of some of the works I make. It's not too late to sign up. Click this link if you're interested.

Here's another tower I made yesterday, overlapping levi and terra cotta colors. One person on facebook likened my colorful tower (from yesterdays's post) to the Dr. Suess tower, "Oh, the places you'll go!" I've never seen that illustration before but you know that's exactly what my towers are about. Setting your mind, the viewer's mind, free to wonder and wander.

I originally called these 'Towers of Whimsy' but they can also be called 'Towers of Wonder'. What's their purpose? Fun, happiness and wonder. The one I made yesterday has a separate plate; something can be stored underneath, something secret, something you cherish, even your thoughts and memories. Thanks for reading and for all your comments.

Sunday, August 24, 2014

Mishima Tiles

Fairy and Flowers
9 x 7 inches

These are mishima tiles, (hand etched inlaid color), I made in my class with Diana Fayt. They're glazed with a satin clear.  Each tile stands out from the wall about an inch and they're ready to hang with a built in wire.

Singing Mockingbird
6 x 5 3/4 inches

I'm thinking of making a border on some of my future tiles. 

Chevy and Bluebird
6 1/2 x 6 1/2 inches

Red Poppies
5 x 6 inches

Flower on the Farm
4 1/4 x 6 3/4 inches

I may add some acrylic color to the petals on the flower.  

Park Bench
6 1/2 x 6 inches

This is the first tile I made so the edges are a little rough. Stay tuned for more results from the first glaze firing in my new kiln. Thanks for reading and for all your comments.

Thursday, August 21, 2014

Unloaded & Loaded by Nine

Yesterday I finished my test fire in my new Skutt kiln 1222. This morning I unloaded the shelves. The flat tiles are some of my work from the surfacing e-course with Diana Fayt.

 Other work are large bowls and platters I've been working on over the last several months.

Top shelf I've squeezed in some of my stacked towers. A few are those I intend to add driftwood handles to after firing. I am anxious to see how those work out. The kiln was unloaded and loaded by nine am this morning and it's firing away this bisque load. I have a fan on directed towards the controller like the Skutt manual recommends. Top peep is out and lid is propped till it reaches 1000 F (without an enviro vent).

Instead of coffee I've just had a glass of cold sweet tea and now I'll have my cereal. Hope all the work makes it ok. It's been a while since I fired a kiln. Please keep your fingers crossed. What do you know I have a blog post typed and posted in less than fifteen minutes with added photos. I'm on a roll now. Thanks for reading and for all your comments.

Tuesday, July 15, 2014

Pottery Displays & Surfacing Ecourse

In my net travels I came across some unique pottery displays. This one doesn't look that hard to make but it probably is. Anything asymmetrical appeals to me. I found it on craigslist recently.

 Here's a rustic plate display. Found on Pinterest.

 A simple yet unique idea of boxes stacked on top of one another.

I wouldn't mind s turn-style but it would be extremely heavy to move I think.

Here's a great way to display plates.

Quick way to gain some height, a bench placed on a table top.

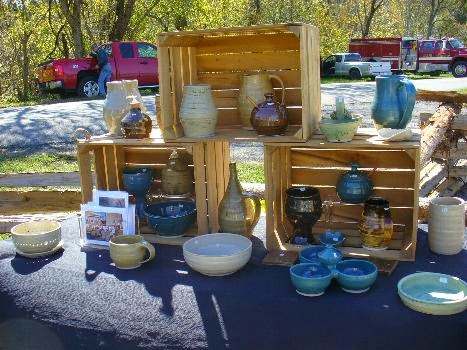
Crates on a table top. I saw these crates for sale at wally world recently, priced very inexpensively.

These curvy displays are made by Smart Fixtures.

All photos were taken from google search, craigslist, etc. Check out these other pottery display ideas on a previous post I did back in 2010.


I'll be a little scarce for the next several weeks since I'm taking on online pottery class with Diana Fayt, The Clayer Surfacing Ecourse. Thanks for reading and for all your ideas.

Saturday, August 1, 2009

Random Layers

Blue Heron by Linda Starr

Above is my favorite of the tiles I completed in the workshop I took with Diana Fayt a while ago. It's not unusual I chose to depict a Blue Heron on one of the tiles. They fly overhead quite often and every year they nest in my neighbors tree and I get to observe the young birds growing and finally flying from the nest. I see the parents flying to and fro bringing food to their young and think how hard they work just to stay alive and feed their family. I guess we're all in a struggle for survival.

Dragonfly by Linda Starr

As I go about my daily chores each day I've become much more observant of my surroundings. I feel lucky because I find the greatest joy in seeing even the smallest creatures such as a Dragonfly. I was thinking about the various animals, birds, and insects which manifest themselves to me and have been wondering about their significance. I'll have to give this more thought; for now I'll be content to know that nature has a strong influence in my art.

Orange Slice by Linda Starr

As I was reviewing the tiles I was thinking about choices and how I came to decide what to depict on the tiles and even what colors to choose. Of course Orange Slice had to be orange, but maybe not. I could have used a different color, but would it be recognizable as an orange then? Diana had quite a wide color range for us to choose from but for most of these I chose to use the same colors. I also noticed I used both yellow and orange and those aren't colors I normally would choose. I was trying to achieve a stark contrast, particularly in Yellow Tree.

Pinwheel by Linda Starr

You may not be able to see in the photograph, but the Pinwheel in the tile is raised above the rest of the tile. I used the shellac technique to wash away the clay surrounding the pinwheel. I painted on the shellac and when it dried I took a sponge and gently wiped the clay removing a little at a time till I got the effect I wanted.

Yellow Tree by Linda Starr

Generally I like things very orderly with crisp lines, but Diana encouraged us to let the underglazes flow beyond the lines, and to overlap the illustrations we used. I was trying to obtain a layered look. It's not that easy to achieve random layers. I think the Balance tile was the most successful for random layers. In the Blue Heron tile I was trying to achieve a watercolor painting look with the background color. This is a technique I want to use more because I like that look a lot. It reminds me of the surfaces Judy Shreve is achieving on her new work.

Balance by Linda Starr

I plan on making more tiles and practicing these techniques and others I'd like to try. Knowing when to stop adding embellishments to the tiles is something I want to improve upon. A certain amount of negative space or just a muted background color on the tile is more effective than filling up the whole tile with images. I'd also like my tiles to be more asymmetrical and I'd like to explore using different color combinations. The more I learn, the more I realize the more I need (and like) to learn. Thanks for a great workshop, Diana.