Monday, December 7, 2009

What Is It


Open Vase by Linda Starr
handbuilt cassius basaltic clay, 6 x 2 inches

Do you ever sketch something and think to yourself, that's not possible to make. Well that's what I did for this piece. I've been thinking, "How in the heck am I going to get the strips of clay to stand upright and attach the curved piece with only two hands?"


Sketch for Open Vase by Linda Starr

Here's the sketch I did a few months ago but never tried to make the piece till yesterday. I love a challenge so I decided to try it and so far it's holding together. I'm calling it an open vase. What do you think? Have any other good names for it? In my mind I was thinking it would be good for dried flowers. This piece is a little rough around the edges, but now that I know I can make it, I'll make more and perfect the design. I want to make it taller maybe about 12 to 15 inches and flare out the top. I showed it to Gary and he said it could be a toothbrush holder, a match holder, a candle holder, maybe it's just a sculpture.


Casserole Dish by Linda Starr
pinched Texas white clay, 4 x 9 inches

Here are the handles I decided to put on the pinched casserole dish. Rather than a handle over the top I decided the two side handles would let the dish be more useful in the kitchen. The dish is kind of heavy so I curved the handles down so the fingers can get a good grip underneath.


Coil Pot by Linda Starr
flat coiled cassius basaltic clay, 8 x 8 inches

For this vase I used the flat coiled method which I have always wanted to try. After I built the vase I hammered the sides with a metal spoon and held a dry sponge on the inside to support the sides. I also smoothed the sides with the back of a spoon. Once I did all the smoothing, the sides were too flimsy to even move the vase and I wondered how I could smooth out the base.


Luckily I am reading a book by Susan Peterson about traditional Acoma pottery by Lucy M Lewis and I learned how how Lucy Lewis used different sized huditzi to support the bottom of her pots. Think of the huditzi as a curved saucer. Eastern pueblos call the saucers puki. Since I'd like to continue making coiled pots, I'll need to make some huditzi. Lucy Lewis is known for her black on white decorative pots. For my pot I plan on decorating it with white. I am still thinking about the design for this pot.


bottom of hump mold plates by Linda Starr

Here are the hump mold plates I made the other day. Now that they've firmed up a bit I turned them over to see how the insides looked and to gently smooth the edges. I put them back on the molds though as I don't want the sides to droop out flat. Diane of Living River North was asking me if I picture food in functional ware while I'm making it. Sometimes I do and sometimes I don't, but for these bowls I was thinking they would look good with a salad in them with the edges or rim of the bowl left showing a bit. What about you, do you think about what the food will look like in a pot you are making for the kitchen? Oh check out Diane's blog for some great recipes and she recommended a wonderful book called Pots in the Kitchen by Josie Walters. I may just have to get myself an early Christmas present.


inside of hump mold plates by Linda Starr

Day before yesterday I started to develop a sore throat and a runny nose. I was afraid it would turn into the flu. I took one of the Wellness Formula and today I am much better. I am not a doctor and I don't have stock in this company (but maybe I should) but these herbal pills work wonders. Take one the minute you think you aren't feeling quite right and you will get well much quicker. they are a mega dose of vitamins, garlic and a few herbs to boost your immune system. The small bottle is rather expensive at about one dollar a pill, but I trip to the doctor with the copay or deductible would be much more than the cost of the bottle so I figure it is well worth it.


Normally in California all our rain comes in the winter and we've had a long dry spell. We're supposed to be entering a wet pattern and I am really enjoying the rain today. I guess I'll have bowl of cereal and some orange juice and make some more pots.

Friday, December 4, 2009

Easy Hump Mold

Red Textured Bowl by Linda Starr
slab built, 1.25 x 6 inches, cone 10 reduction

Several years ago I made this red bowl with an easy hump mold. I used half and half clay, textured the slab, and scalloped the edges.


I decided to try using paper bowls as my hump mold and here's what I did. I started with an ordinary paper bowl and cut off the rim. I used two paper bowls placed together to make the hump mold more sturdy. Turn the paper bowl upside down and that's your hump mold. Set the mold aside while you prepare your clay.


Today I am using Texas white which is a cone 5 clay. For this size bowl, I started with a three by three inch squared block of clay. You can put a rice bag underneath the paper plate hump mold if it starts to sag when you place the slab of clay over the mold.


Start slapping the 3 x 3 inch block of clay between your hands. Slap the clay on one side and then slap it on the other, flipping it over between your two palms and rotating it around. Slap the clay till it's about half an inch thick. Don't be shy, slap away. The clay and ultimately your bowl will be much happier in the end if you slap and compress the clay at this point.


Next put the slapped clay down on your rolling surface and start to roll the clay with a rolling pin. Rolling the clay on a smooth sheet of cotton material works well because you can move the clay around easily without it sticking to the bottom surface. Flip the clay over and rotate the clay every three or four rolls of the rolling pin. This is very important. The flipping and rotating of the clay helps to prevent warping of the finished bowl. I rolled my clay about three eighths of an inch thick.


Let the slab of clay firm just a bit. At this point you can texture the slab of clay if you wish. Gently move the slab and drape it over the paper bowl mold. Try not to stretch the clay or leave any finger prints in the clay while you center the slab of clay over the hump mold. You can let the sides droop flat for a wide rim or cut them off even with the bottom. Trim the excess from around the edges and smooth the edges with a damp sea sponge. Reserve the trimmed portions for the foot of the bowl.


Take the trimmed pieces and squish the clay together really well in the palm of your hand and roll it round in a ball. Flatten the ball and form it into a round flat piece. If the edges get dry and cracked moisten them with a sea sponge lightly and smooth. You can make the foot large or small. Each time I make a bowl I like to experiment with several different foot shapes and sizes.


Cut the center out of the round and smooth the inside and out side. Lay the round on the bottom of the bowl and mark the inside and outside.


Set the round aside and score the bottom of the round and the outlined portion of the bowl. Next sign your name in the center of the foot before you attach it. It's easier to sign without the foot on the bowl. Slip both the bowl and the foot well and attach the foot by pressing firmly and gently sliding it back and forth ever so slightly. The sliding assures a firm attachment of the foot to the bowl.


Notice the bowl with the foot below and the bowl where I pictured the trimming above are two different shapes along the edges. For the bowl below I left the edges more asymmetrical. That's one of the many reasons I like hand building and slab building with clay. Each handmade piece of pottery is little different than the next which makes it unique.


Cover the bowl lightly with plastic and leave upside down until it is completely dry and then turn over and fire according to your preference. Hopefully someone who likes to hand build can benefit from my description. You're welcome to copy my process, but please give me credit by referencing back to my blog. Comments and questions are welcome, thanks.

Thursday, December 3, 2009

Crazy for Clay

cassius basaltic clay pinch bowl, 4 x 9 inches

Quite by accident, one of my glazes formed a unique surface on a very black clay, cassius basaltic. I called the surface moon craters. Ever since then I've been thinking of how I could use the moon craters to advantage. I just couldn't get the unique surface out of my mind and really wanted to attempt to replicate the moon craters.

sketch for cassius basaltic pinch bowl

I planned on making a tall coiled vase based on a couple of drawings in my sketch book, but the piece I ended up making was a wide pinch bowl. Since I'm in a motorhome with limited space I decided to use the pinch bowl. For my sketch above, imagine the background being the black clay and the stripes and dots being white.

moon craters unique glaze surface (interior)

My sketch book is filling up with drawings for the cassius basaltic clay with moon craters and I have plans to make some tiles and groups of tiles. Of course I had to get some white clay for the stripes and will have to use that up too.


Not sure where I will store the greenware while it is drying. We have our three cats in the motorhome, so everything drying must be put some place they can't get to it. I just couldn't stop myself from getting a couple of bags of clay and trying a few of my ideas. I also have a few ware boards, my tool box, and glazes.

Texas white pinch bowl, 3 x 7 inches

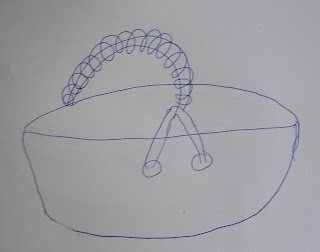
Here's another pinch bowl I made today with Texas white clay. I've never tried this clay before. After I made the bowl I thought it would look good with a handle across the top. I want to make the handle look like it's woven from reeds. I have a few more ideas about the handle.

sketch for handle on Texas white pinch bowl

We plan on leaving in about two more weeks, hopefully they'll be dry by then I can at least get them bisqued. Then perhaps I can find a place along the way to get them fired. What do you think, am I crazy for clay or what?

Wednesday, December 2, 2009

Mooney Grove Museum


Now that I'm no longer a farmer I had time to visit Mooney Grove Museum in Visalia. As I walked through the museum I was impressed with how self sufficient and creative early Native Americans were, making use of the natural elements available to them from the surrounding countryside.