Showing posts with label luminary. Show all posts

Friday, November 14, 2014

Keeping the Light On

Here's one of my tree luminaries. This one is glazed an olive green with a yellow star at the top. I have one of those battery operated votive candles inside. I'm keeping the light on because I'm firing the kiln right now. I spent all day yesterday glazing. I have four more luminaries in this firing and other work so stay tuned for photos soon.

The winter vortex arrived and it's 27 F outside but the kiln room is nice and toasty. I gave Barney a wool blanket. That might seem exorbitant but I got it at a thrift store. Hopefully he's staying warmer. Gary said he saw Barney go in his covered bed the other day but he came back out. Gary also said he's seen Barney going in the culvert under the driveway. When it's raining he couldn't go in there since it would be full of water. I just peeked outside and Barney is snuggled up in his wool blanket. Thanks for reading and for all your comments.

Wednesday, March 19, 2014

Wagon Wheel Patio Set and a Lantern

You know how Gary and I both love turquoise. The other day we went to an antique mall and picked up this unique patio set for our deck. The arms and the table top are shaped like wagon wheels. I'm sure this set was hand crafted by an artistic wood worker, it's very sturdily built. The set was originally painted red and was repainted this turquoise color. Looks like our garden theme will be eclectic.

Would you believe I kept the pieces of this lantern or luminary under plastic for over two weeks and then put them together today? It's true. I laid the pieces on thick plastic and covered them with the same piece of thick plastic wrapped around. They stayed workable all that time. I was sure surprised.

I made the lantern in three pieces, the base, the middle and the top. It's about eight inches tall. It's meant as a table top lantern to be used indoors or out. We've been doing some work outside so I've been thinking of pottery pieces for gardens. I think a lantern would look nice on the table of our new patio set. Perhaps not the lantern I made since it has a more Asian feel to it. I think I should have made the top larger, next time. I'd like to modify the top so that it fits down over the sides to make it more stable. What do you think, any suggestions? I just realized since the lantern is in three pieces I can make another top.

The pagoda lantern above is 18 feet tall and is in the Japanese Gardens in Portland, Oregon. I've been to those gardens, they're well worth visiting if you're in the area. If you're ever stressed out take a trip to a garden and let nature wash over you. It works for me every time. Stay tuned for a home project and a update on plants we've added to our garden. Thanks for reading and for all your comments.

Monday, January 28, 2013

How Much Is Too Much ?

Sometimes when I let myself go I come up with something really great. Other times I come up with something like this vine luminary. Of course I was inspired by my recent visit to the Marie Selby Botanical Gardens in Sarasota. But how much is too much, I think this is it. Although it is rather whimsical, almost castle like.
I like the vine with the flowers, leaves and buds circling around the piece. The opening in the front with the holes and the narrow leaves at the top don't work for me. This piece is about 14 inches tall and 6 inches wide.I wanted to make something withe a floral vine on it. The container I made was large enough to surround the form I used so I left the front open. I cut holes thinking I'd add some fiber through the holes. Then I decided it could be a luminary and hold a large pillar candle. But fiber wouldn't be good mixed with a candle. Then I cut the top into the shape of long narrow leaves and added the vine.

Anyway I've decided to let it dry and fire it to see how it fares. I have several revisions floating around in my head. I think the vine would be good on a plain background. The tall narrow leaves would be better as a piece by themselves. The opening in the front would be better without the tall narrow leaves and the vine. Gee that's three different pieces I can develop and refine by making this one. So all is not lost; it doesn't hurt to try something even if it isn't quite what I had in mind. Thanks for reading and for all your comments.

Friday, November 16, 2012

Tree Luminary and Process

Miracles never cease, I made something I said I was going to make instead of going off on another tangent. Here's a tree luminary complete with a star topper. Since I have star cutouts I didn't need to leave the top open for firing in the kiln.

I construct these pieces in a unique way. First I start at the bottom which eventually becomes the middle of the tree. As I get progressively taller and wider the clay being very moist has a tendency to be too soft to stand without slumping. Michele would be proud of me I used my hair dryer on the piece this time. It helped. Thanks Michele.

Here's what the inside of the piece looks like as I am constructing it. You can see all the layers overlapping one another.

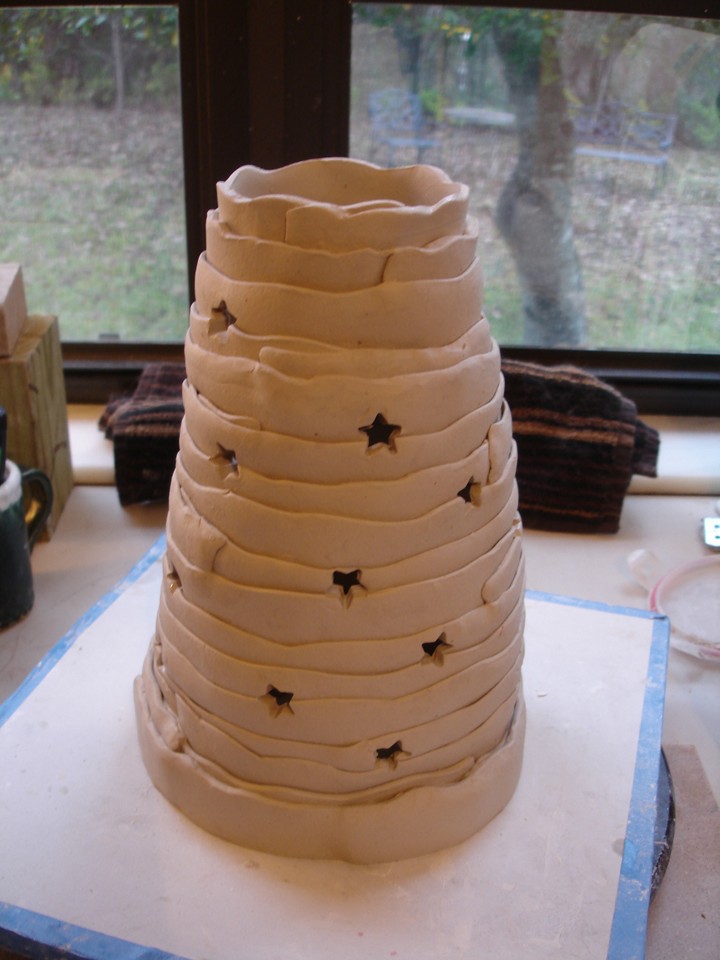
Here I've flipped the piece over and started cutting out the stars to make the luminary. I double up the bottom to be sure it's sturdy enough to hold all the weight of the piece.This piece is about 17 inches tall so there is a lot of wet flexible clay which needs to firm up before it's stable enough to hold more clay weight..

Here I'm mixing up some green stained slip. The green I had was darker than I wanted so I added more slip to thin out the color. Most times I don't measure these stain ingredients, I go by eye for the color. Since I'm making one of a kind pieces the color doesn't have to match. If I needed to make pieces to match I could measure by volume and be assured of similar results.

Here's the luminary tree after I've hand brushed the green slip around the piece. With the cutout stars I couldn't pour the slip over the top and I didn't want green on the inside of the stars to I had to be careful applying the green slip.

For the bands of snow I thought the white stoneware slip wouldn't be white enough. I remembered I had some white extender stain so I mixed up a small batch. I was going to apply the white stained slip with wide mouthed applicator but the slip was too thick. I thinned it out and it was too thin.  So I hand brushed it around the piece. I wanted the white slip to be thick like drifts of snow. I may go back tomorrow and apply more slip but maybe not. I'm afraid if I apply too many layers it may not bond to the previous layer and flake off. I may leave well enough alone. Still in the back of my mind I'm wondering how to make a much thicker slip? Some slip with some volume that's stays put on this vertical surface? What do you think?

Now the piece is drying and I'll make a plate for underneath so a candle can be placed inside. I can't wait to see how this one looks with the lights turned off. I wish I could work faster on these, I think a grouping of these luminary trees would be wonderful in graduated sizes. Of course if I wasn't making it in layers it would be quicker, but then it wouldn't be as detailed as this one. This post is part of Artists in Blogland show and tell Saturday. Thanks for reading and for all your comments.