Showing posts with label slip. Show all posts

Friday, November 16, 2012

Tree Luminary and Process

Miracles never cease, I made something I said I was going to make instead of going off on another tangent. Here's a tree luminary complete with a star topper. Since I have star cutouts I didn't need to leave the top open for firing in the kiln.

I construct these pieces in a unique way. First I start at the bottom which eventually becomes the middle of the tree. As I get progressively taller and wider the clay being very moist has a tendency to be too soft to stand without slumping. Michele would be proud of me I used my hair dryer on the piece this time. It helped. Thanks Michele.

Here's what the inside of the piece looks like as I am constructing it. You can see all the layers overlapping one another.

Here I've flipped the piece over and started cutting out the stars to make the luminary. I double up the bottom to be sure it's sturdy enough to hold all the weight of the piece.This piece is about 17 inches tall so there is a lot of wet flexible clay which needs to firm up before it's stable enough to hold more clay weight..

Here I'm mixing up some green stained slip. The green I had was darker than I wanted so I added more slip to thin out the color. Most times I don't measure these stain ingredients, I go by eye for the color. Since I'm making one of a kind pieces the color doesn't have to match. If I needed to make pieces to match I could measure by volume and be assured of similar results.

Here's the luminary tree after I've hand brushed the green slip around the piece. With the cutout stars I couldn't pour the slip over the top and I didn't want green on the inside of the stars to I had to be careful applying the green slip.

For the bands of snow I thought the white stoneware slip wouldn't be white enough. I remembered I had some white extender stain so I mixed up a small batch. I was going to apply the white stained slip with wide mouthed applicator but the slip was too thick. I thinned it out and it was too thin.  So I hand brushed it around the piece. I wanted the white slip to be thick like drifts of snow. I may go back tomorrow and apply more slip but maybe not. I'm afraid if I apply too many layers it may not bond to the previous layer and flake off. I may leave well enough alone. Still in the back of my mind I'm wondering how to make a much thicker slip? Some slip with some volume that's stays put on this vertical surface? What do you think?

Now the piece is drying and I'll make a plate for underneath so a candle can be placed inside. I can't wait to see how this one looks with the lights turned off. I wish I could work faster on these, I think a grouping of these luminary trees would be wonderful in graduated sizes. Of course if I wasn't making it in layers it would be quicker, but then it wouldn't be as detailed as this one. This post is part of Artists in Blogland show and tell Saturday. Thanks for reading and for all your comments.

Wednesday, February 18, 2009

Fern Fossils

fern-leaf-panel-with-fern-applied-as-resist
Fern Leaf Panel
fern applied as resist to green ware
later sky blue slip applied, then bisque fired

I just retrieved my leaf panels out of the bisque load yesterday. I use leaves as a resist on the panels and then I paint slip over the whole panel including the leaves. I usually peel the leaves off before firing. This time I was in a rush and just left the slip coated leaves on the panels, thinking the leaves would just burn out. The popular leaves on two leaf panels burned out, leaving a powdery residue I easily brushed away. The fern leaf panel still had slip adhering where the fern leaves were, so I had to scrape away the residue of the fern coated slip.

fern-leaf-panel-after-bisque-firing
Fern Leaf Panel
sky blue colored slip applied over fern
after bisque firing, slip scraped from fern sections

As I scraped away, I wondered why the fern coated slip didn't turn to ash like the other leaves. I thought maybe the fern leaves burned at a higher temperature than the other leaves, but this didn't make any sense. Even though the kiln probably only got to Cone 07 (that's another story), I knew 1785 F or so was hot enough to burn up the fern. As I scraped away the slip where the fern impression was, I saw the fern leaf itself was actually gone, but the slip seemed to have chemically reacted with the fern leaf, changing the chemical composition of the slip. If I wiped the panel with a wet sponge, the slip coated fern portion turned a darker color. The slip on the other parts of the panel remained dry and were bonded to the clay.

fern-platter-fern-slip-resist
Fern Platter
fern used as resist,
white slip applied to red clay,
fern removed, ready for bisque firing

I started thinking about fern fossils and how they are formed. I discovered ferns are some of the most common fossils found on earth. Most fern fossils are found near coal mines. The leaf tissue rapidly decomposes and is preserved by chemical reactions of calcite and iron carbonate. I'd like to experiment further with ferns. Next time I'll let the fern remain on the clay through the glaze firing and see if I can produce some man made fern fossils. I'd also like to see some actual fern fossils and try to replicate the look of them on clay. Every process in clay seems to lead me to another process and more experimentation. This week I'm glazing my leaf panels; they should be ready to show you in a couple of weeks. I can't wait to see how they turn out.

For some reason I am drawn to ferns. Ferns appear delicate yet are quite hardy, growing in places where other plants cannot or will not. In West African wisdom ferns are a symbol of endurance, defiance against difficulties, hardiness, perseverance, independence and resourcefulness. This explains a lot about why I am drawn to ferns.

rose-number-33
Rose Number 33, along fence line
if you know this rose, please let me know
if not, just guess or make a comment anyway

There were about 40 different rose bushes planted along the fence line, when I moved here. I have no idea what varieties they are. Since I have so many roses I thought I would post a rose every time I post on my blog. If you know the name of the rose, please let me know.

Tuesday, February 10, 2009

Slip Decorating Butterflies

practice-slip-butterfly
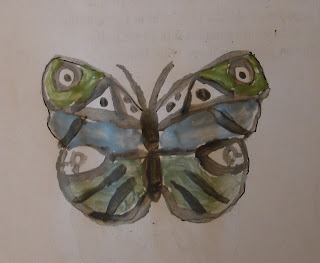
Last night I thought about embellishing the butterflies on the wall pocket I slipped yesterday. So I started out practicing with an outline of a butterfly drawn on a scrap of paper. I practiced with the three different colors of slip I made: ivy green, sky blue and best black. I made the colored slip by mixing mason stains into slip which was made from the same clay body I have used for the pieces I created.

butterfly-stickers
For the outline of the butterfly on the wall pocket, I used stickers I purchased from the dollar store. I got the idea of using stickers from Lori's blog, Fine Mess Pottery. I place the stickers where I want the clay color to remain, then I paint the colored slip over the whole piece. When the slip dries, I peel off the sticker and put it back on the paper it came on. I found out I can wipe the slip off the sticker and re-use the sticker. Talk about recycling.

wall-pocket-slip-decorated-butterflies
As I was embellishing the butterflies, I was wishing I had more colors to play with, maybe yellow or orange, but I want to see how these colors turn out before investing in any more colors. Very little slip is needed to paint the lines and circles on the butterflies which means the slip will last a very long time. I think my painting on paper is better than it is on the clay, but I like the butterflies on the wall pocket better than just the plain white color of the clay showing through.

What do you think about my just putting clear glaze on the inside of the pocket and leaving the outside slipped but not glazed? That way water could be put inside but the outside would remain the muted color it is now? Of course, I don't really know what the Cone 10 temperature will do to the color, it may be a lot darker when it gets fired or it may burn out or flake off. Hope not though.

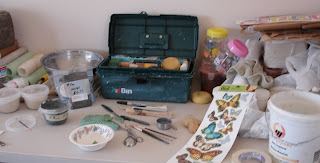
overflowing-work-table
While I was working in my studio, I created quite a mess with paint brushes, tubs of slip, paper bowls with more slip in them, and on and on. I guess sometimes you have to make a mess to be creative. As I was painting away, a huge squall of rain, sleet, and hail was erupting outside.

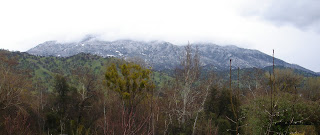
Black-Mountain-with-snow-down-to-2000-feet
When I left the studio I saw Black Mountain has snow down to the 2,000 foot elevation. The top of Black Mountain is obscured by clouds. Black Mountain has one of the finest groves of Giant Sequoia throughout the range of Big Trees. From my house I can see the outline of the Giant Sequoia trees on the top of Black Mountain even though the mountain is about five miles away. That gives you an idea of the size of these trees. To visit the Giant Sequoias is a very humbling and awesome experience. My elevation is 1,000 feet, I wonder if we will have any snow in the morning?

Monday, February 9, 2009

Blue and Green Slip


All of a sudden it's cold outside again, so I decided to stay inside and continue my slip slop stain experiments. Remember this pinched porcelain bowl I made as a warm up after the holidays? Now I've used this same bowl to experiment with my first batch of sky blue slip. I decided to use a butterfly shape as a contrast to the colored slip. My pinched bowl is now a butterfly bowl. I don't have a clue what I'll do after I bisque the piece. Will I put a clear glaze over it? I'll wait to see how it turns after the bisque firing, then I'll decide.


A few weeks ago, I did some clay weaving. Today I put some of my green slip in a pattern on the woven tray. I do have a glazing plan for the remaining sections of this piece. I'm planning on using a matt yellow glaze with temoku accents over the top. I'll use clear glaze over the green stained sections.


Here's a porcelain wall pocket I made a few weeks ago. Again I am using a butterfly shape to contrast with green slip. I've no idea about the final outcome of this piece. That's half the fun of using clay as an artistic medium. Will it be glazed, pit fired, barrel fired, time will tell. Perhaps I will try it in a barrel firing. I'm still trying to get enough stuff bisqued for the barrel firing, hopefully next weekend I'll at least have one barrel firing.


This weekend I went to the feed store to get some straw (which was the last ingredient I still needed for my barrel firing). I noticed they had bales of rice hulls, so I got one bale. I knew I had read something about rice hulls before but couldn't remember what.

Now that I'm home I read rice hulls can be hard to burn, so perhaps I'll mix them in with some straw. I also read rice hulls contain large amounts of silica, but also contain sodium, potassium, calcium, magnesium, iron, copper, manganese and zinc. I plan to save the rice hull ash from the firing for future experiments. Wonder what would happen if I mixed some rice hulls into some wet clay? Or coffee beans - I think I remember something about them too. It's never ending, isn't it - so many ideas for clay and so little time.

How about you? What experiments have you done? Or what experiments would you like to do? Comments and advice are always welcome.

Thursday, February 5, 2009

Slip Slop Stain

clay-palm-tree-sculpture
I've been wanting to experiment with some colored slips. I decided to try mason stains, since there is such a wide range of color choices. The perfect opportunity came when a green ware, palm tree sculpture I was moving fell on the floor. It was broken beyond repair. It took me forever making all those palm fronds and propping them up with crumpled pieces of paper bag. Boo Hoo! But it'll make the best slip, right?

clay-drying-in-the-sun
I broke the sculpture up into a bunch of little pieces and laid them all out to dry out. One of my classmates walked by and was staring at the ware board of clay particles with a quizzical look. So I said to him (very seriously), "How do you like my sculpture?" He said, "Very nice, Linda". I replied, "I call it free form sculpture". He said, "OK, Linda". I didn't want to keep him in suspense so I told him what I was doing. Perhaps I should have just let him wonder. I took all the pieces of clay home to set them in the sun the next day to dry.

clay-slaking
I usually mix up my slip with a large metal tablespoon. This time I wanted my slip to be real smooth, so after I let the dry clay slake in water, I took the bowl outside and mixed it up with my hand held mixer. It came out real creamy. Notice my professional looking cardboard box table top on the gravel driveway. It's supposed to rain tomorrow so I wanted to get this mixed up today. I sure wasn't going to mix it inside, clay would have splattered everywhere.

mixing-bowl-full-of-slip
I am calling the 'real', scientific method of measurement I'm using a slip slop stain. I make up some slip, I slop it into a container and I add some stain. It's not quite that haphazard, but it isn't weighed either. I am using a type of volumetric measurement described recently in Ceramic Arts Daily.

measuring-cups-and-spoons
In the article Sumi Von Dassow recommended using 2 tablespoons of stain for 8 ounces of glaze. That's about 12 percent stain. I want to try 5 percent and 10 percent stain in my slip. One cup of slip is 48 teaspoons or 16 tablespoons. Five percent of stain would be 0.8 tablespoons or 2.4 teaspoons and ten percent of stain would be 1.6 tablespoons or 4.8 teaspoons. I read when firing Cone 10, I should need less stain than I would at Cone 6, the opposite of what I would normally think. A higher temperature makes a brighter color with less stain. I know I'm putting the stains in slip not glaze, we'll see what happens.

mason-stains
Surely Jane Peiser and Vince Pitelka would cringe at my slip slop stain description and methods, but we all have to start somewhere with our experiments and I am beginning here. I will be testing Sky Blue, Ivy, and Best Black, mason stains. I am adding these to my porcelain slip and I will be firing to Cone 10. I may also try the same stains on my Soldate 60 stoneware body to see how they react with that clay body. I also want to try come colored clay inlays too. Whoh! That's a whole lot of experiments.

plastic-containers-of-slip
If you have any advice or experience using stains, please share. What do you store your small batches of slip in? I've got some small plastic containers I purchased in a pack of three and some larger ones I picked up at the dollar store. If I don't run out of time and slip, I'll also try some Copper Carbonate, Copper Oxide and Red Iron Oxide combos too.

garden-glider
Now that I've written all about the mixtures I'll be making, I better get off my d**f - uh, garden bench - and get busy making my slip slop stain. Look for more experiments in the future with Frit 3134 and some Nickle Oxide? Comments and advice are always welcome, this mad scientist can use all the help she can get. Toodles for now.