Showing posts with label bluestarrgallery. Show all posts

Sunday, November 25, 2012

Arts Business Institute & Ornaments

A big thanks to the Arts Business Institute for choosing my cart with green wheels for their Handmade Holiday Gift Guide. The Arts Business Institute is an educational nonprofit that partners with regional art guilds, educational institutions and development organizations. They give practical business education to creative entrepreneurs. I've also opened a Big Cartel shop where you can see some of my sculptural work for sale.

Two posts ago I mentioned the copper carbonate which I put on some of my holiday ornaments not being so appealing for ornaments. The good news is most of them turned out just fine after I glazed them.

I've strung them on ribbon I had left over from my lavender farm gift shop. It's amazing how much time even a small ornament takes to make. Cut it out, stamp it with texture, brush oxide on, dry it, sand it, fire it, glaze it, fire it again, string ribbon on it. There they are in the kiln, seems they shrink quite a bit since they were almost touching before firing.

Yesterday Gary went to a local church sale and sold a few pieces of my pottery. Many locals are repeat customers. Next Saturday I'll be at Christmas in the Hills in Beverly Hills (Florida) which is right around the corner from us. The event is put on by the Parks and Recreation Department and the Lions Club. Donations will be accepted for Toys for Tots. There will be a parade, car show, and arts and crafts sale. Hope the weather is good. There's frost on the pumpkin this morning. Up next more experiments with color on plates. Thanks for reading and for all your comments.

Saturday, November 24, 2012

Lots of New Work

10 3/4 x 4 1/4 x  3 1/2 inches

Lots of new work just out of the kiln; I'm so excited over the results of these wider strip stacked pieces. I didn't glaze the exterior of the mahogany basket above because I wanted to keep the rich red color of the slip and muted stain. Now I'm glad I didn't glaze the exterior. I'm thinking a wax rubbed onto the exterior, what do you think? What kind of wax, bee's wax? Or would it be OK just leave the clay naked? Maybe spray with a sealer?

Here's what the interior looks like with a clear satin glaze over it. It's darker in person but the flash distorted the color to much lighter than it really is.

11 1/2 x 3 3/4 x 2 3/4 inches

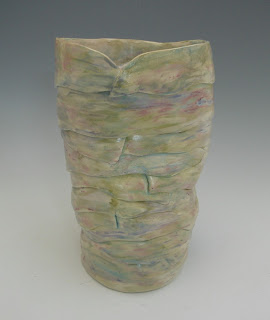
This is the first pastel patina tower I made. For some reason I'm having a hard time getting this one in focus (maybe a solid black background would help). I'll take another photo out of doors when I get a chance. The colors are soft and blended nicely. Notice the two deeper creases at the bottom. I didn't mention this before but when I was making this piece it started to slump down onto itself and I thought I'd loose it. I inserted a half full paper towel roll inside and laid it down on it's side on a foam pad for quite some time till it firmed up. 

9 x 6 x 4 1/2 inches

These pastel towers are so much nicer in person then in my photos. The colors are muted and the satin clear glaze gives a nice sheen to the surface. Most of these are tapered smaller at the bottom. This one is 6 inches wide at the top and 4 1/2 inches wide at the bottom.

With the stacked strip construction, the interiors are just as interesting as the exteriors. Hum maybe I should make a cave shaped sculpture, something to look into, with a small light at the end of the tunnel, but I digress. 

10 x 6 1/4 x 3 1/2 inches

This tower had the same red clay slip as the mahogany basket, but this is the clay the supplier said was similar to my white stoneware but it's not the same with the clear glaze over the top. Almost all of the red slip burned out. Several folks said there's an ingredient in the clay which reacts with the glaze and causes the color to burn out. Still this came out nice with it's muted colors. This piece has a hole on either side for me to add a handle. Perhaps woven reed or something similar, we shall see.

8 3/4 x 5 3/4 x 4 1/2 inches

This one turned out a darker green and not as blended as I wanted. I'll be working on blending the slip colors so they are more subtle which is the surface I want to achieve for the stained pieces.

7 1/2 x 4 3/4 x 3 3/4 inches

8 1/2 x 4 1/8 inches

8 x 4 inches

9 1/4 x 5 inches

This one is from the previous type of stacked strips. The lid was fired separate from the canister. 

Blue Gray Strip Stacked Bowl
5 x 9 inches

Now I have the painstaking process of checking these to be sure they hold water. I fill them with water and let them sit for several hours to be sure. With the stacked strips there are so many seams there's always a danger a seam might have a slight gap which mayt allow liquid to seep out. Hopefully all of them are acceptable. All in all I'm very pleased. I've got some great pieces and several directions to move forward. Coming up are the ornaments which turned out better than I thought, and more of the colorful plates I'm working on. This post is part of Mud Colony what's happening in the studio. Thanks for reading and for all your comments.

Friday, November 23, 2012

Faux Extruders & Black Copper

Here's how the copper carbonate stain came out on the ornaments, dark brown/black and not so appealing. I mixed copper carbonate with frit. I didn't get a very even coverage either. Any ideas about that? I glazed them anyway, we shall see how they turn out with glaze over the top.

All is not lost however, because I think this stain would much better on a different piece of pottery like one of my stacked towers. It has an ancient sepia tone look to it.

The other day I drove past a yard sale and stopped and picked up two cookie presses. I hope to use them as a clay extruder. Four dollars for both, not bad. The glaze load is almost ready to unload so stay tuned for some photos real soon. Thanks for reading and for all your comments.

Thursday, November 22, 2012

Happy Thanksgiving

 Some of you may have already seen this turkey but he's so beautiful I decided to show him again. He lives down the road from us on a small truck farm. At least he did the last time I was there, hope he still does.

The bisque load all came out fine, so I glazed all day yesterday and today I'm firing a glaze load. Stay tuned for new work coming soon. Today I'm thankful for a wonderful husband, a roof over my head, food on my table, and for having a dedicated studio I can work in. And I'm thankful for all you fine readers and supporters of my art; hope you are having a relaxing Thanksgiving. Thanks for reading and for all your comments.

Wednesday, November 21, 2012

Bald Eagle and a Bisque

A bisque is cooling down right now. In the kiln are strip stacked pieces, some with slip and stains and some not. The large bowl is also strip stacked. I am anxious to see how these wider strip stacked pieces fire. Hope they stay together. Please keep your fingers crossed for me for this load.

The other day on the way to the store we spotted a bald eagle on top of a telephone pole. I wish I had a better telephoto lens on my camera. These are striking birds to see in person.

Gary and I were also surprised to see a ring-tailed cat on a separate trip. I tried to get a photo and at one point I was hopeful because the critter stopped and stood on his hind legs looking at us in curiosity. But when I got out of the car to take a photo, the little guy quickly ran into the woods. Now we're looking in the same area each time we return hoping to get a photo. When I came home I read ring-tailed cats are not native to this part of the United States. I reported the sighting to the Fish and Game and they're hoping I can get a photo. They said Florida is home to more exotic animals than any other state. Some are escaped pets and some smuggled or illegal imports.

Yesterday was the first sunny day we've had in a week and the female gopher tortoise was briefly out of her den. It's been completely overcast every other day this past week which is unusual for here in Florida. The weather has been dry and mild and yesterday we could smell citrus trees blooming in the air. Have a wonderful and relaxing Thanksgiving. Thanks for reading and for all your comments.

Tuesday, November 20, 2012

'Steppin Out'

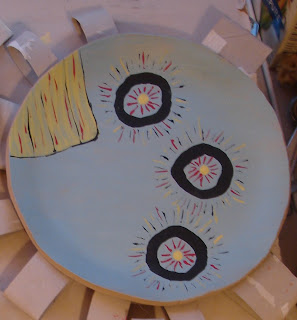
Originally I had an idea to make a turquoise plate with some sgraffito lines through the slip in sort of a wave pattern, perhaps with a couple of circles. After I brushed the slip on the two dinner and lunch plates, I just couldn't bring myself to cut through the slip. For some reason I've been trapped in my old ways, in my old color patterns. The thought popped into my head to let myself use colors I don't normally think of as being used together. Perhaps use colors close to one another on the color wheel.

I'm 'steppin out' of my comfort zone using turquoise, red, yellow, and black together. Well the turquoise isn't out of my comfort zone because that's my favorite color, but the red, yellow and black are, especially used with the turquoise. Yesterday I really liked these and I still do but I think I can tweak the design a bit. By making the 'lights' a bit smaller and the triangle (which reminds me of a roof line) slightly larger and leaving more open space. Perhaps increasing the red color. My line quality isn't the greatest I think I need some newer brushes, the ones I've been using are very inexpensive and are starting to break down. I'll be checking into some newer ones and practice will also help me improve. As I looked at these I thought of making several mix and match styles of plates. One with just the triangle colors; a bowl with one light in the bottom of it and perhaps one on the outside.

Above is my original idea for the new plate design. Today other shapes and color combinations are coming to mind. When I showed these to Gary he said, you are finally learning. He's been after me for years to "use more color" "use brighter colors". Perhaps I was afraid of color, afraid of using colors not often seen together. For years now I've been craving something more modern, more retro, more bold, but that feeling was trapped inside me somewhere. If I can just let myself go, go with the flow long enough, I think I can let those feelings, those colors, those patterns out. Look for more 'steppin out' coming soon. Thanks for reading and for all your comments.

Monday, November 19, 2012

My First Basket

Here's my first basket, a market basket, which I made in a basket making workshop this past weekend at The Garden Shed. The basket is 18 inches long, 13 inches tall at the handle, and 7 inches deep in the basket portion. This is a great size basket to carry vegetables at a farmer's market or from the vegetable garden into the home. Following are more photos from the workshop.

When I am weaving with my hands with either clay or reed I feel connected to ancient peoples and history. I like the fact that basket making and pottery have been around for such a long time and each craft can be both utilitarian and decorative.


The other thing about pottery and basket making is they can either be made alone or in groups and they can be shared and exchanged. They can be simple or complicated to make depending upon the maker's mood and preference.


The maker has a choice of materials, style, and color; each basket or piece of pottery has their own personality and the mark of the maker.

 Here's our group hard at work. Our basket making teacher, Ralph Fleming, is on the right.

This is the basket Ralph, our teacher, brought as an example for us. Notice the difference in the color of the basket and the rolls of reed below it. The basket has been stained with an oak stain which preserves the reed and gives it some color. I have to decide how to stain my basket. I may white wash mine I'd like to keep it a lighter color.

I want to make this shape of basket next. Of course you know I'll be researching all the different types of baskets, their histories, the materials, and their uses. I'd also like to try using palm fronds in a basket. And then there are those sweetgrass baskets I saw in South Carolina a few years back which were so fragrant. I have ideas about incorporating found objects and clay beads into a basket and incorporating some basket material with clay pieces too. There are Native American inspired baskets and Nantucket style baskets which inspire me. And I'm particularly drawn to Asian style baskets made of reeds or bamboo.

I'm wondering how to make a round shaped basket. From there I think I can branch out on my own making baskets. One good thing about basket making is I can stop at any time and set the basket aside to work on at a later time. With clay I have to keep going while I am making something. Baskets are lightweight but pottery is heavy, but both are useful and can last for years. I can see many a creative hour being spent making baskets. Up next I'm 'steppin out with a new plate(s) design, so stay tuned. Thanks for reading and for all your comments.

Saturday, November 17, 2012

Basket Weaving Class

Today I'm taking a basket weaving class at The Garden Shed at 2324 S Rockcrusher Road in Homosassa. If you haven't been to The Garden Shed stop by for a visit. The shop is full of unique gifts for both the home and garden and they'll be opening a tea shop soon. They also carry a nice selection of my pottery.

I made the plate above for the tree luminary in the previous post. I made the sides straight up and uneven and  I used the white slip so the plate edges will look like drifts of snow. I put a white slip spiral in the center of the plate. I also made another plate for the tone on tone Christmas tree. I'm sliding them from one sheet to another because I made them thick and I want them to dry flat. Stay tuned for info about the basket weaving class coming up soon. Hope you are having a great weekend. Thanks for reading and for all your comments.
Friday, November 16, 2012

Tree Luminary and Process

Miracles never cease, I made something I said I was going to make instead of going off on another tangent. Here's a tree luminary complete with a star topper. Since I have star cutouts I didn't need to leave the top open for firing in the kiln.

I construct these pieces in a unique way. First I start at the bottom which eventually becomes the middle of the tree. As I get progressively taller and wider the clay being very moist has a tendency to be too soft to stand without slumping. Michele would be proud of me I used my hair dryer on the piece this time. It helped. Thanks Michele.

Here's what the inside of the piece looks like as I am constructing it. You can see all the layers overlapping one another.

Here I've flipped the piece over and started cutting out the stars to make the luminary. I double up the bottom to be sure it's sturdy enough to hold all the weight of the piece.This piece is about 17 inches tall so there is a lot of wet flexible clay which needs to firm up before it's stable enough to hold more clay weight..

Here I'm mixing up some green stained slip. The green I had was darker than I wanted so I added more slip to thin out the color. Most times I don't measure these stain ingredients, I go by eye for the color. Since I'm making one of a kind pieces the color doesn't have to match. If I needed to make pieces to match I could measure by volume and be assured of similar results.

Here's the luminary tree after I've hand brushed the green slip around the piece. With the cutout stars I couldn't pour the slip over the top and I didn't want green on the inside of the stars to I had to be careful applying the green slip.

For the bands of snow I thought the white stoneware slip wouldn't be white enough. I remembered I had some white extender stain so I mixed up a small batch. I was going to apply the white stained slip with wide mouthed applicator but the slip was too thick. I thinned it out and it was too thin.  So I hand brushed it around the piece. I wanted the white slip to be thick like drifts of snow. I may go back tomorrow and apply more slip but maybe not. I'm afraid if I apply too many layers it may not bond to the previous layer and flake off. I may leave well enough alone. Still in the back of my mind I'm wondering how to make a much thicker slip? Some slip with some volume that's stays put on this vertical surface? What do you think?

Now the piece is drying and I'll make a plate for underneath so a candle can be placed inside. I can't wait to see how this one looks with the lights turned off. I wish I could work faster on these, I think a grouping of these luminary trees would be wonderful in graduated sizes. Of course if I wasn't making it in layers it would be quicker, but then it wouldn't be as detailed as this one. This post is part of Artists in Blogland show and tell Saturday. Thanks for reading and for all your comments.

Thursday, November 15, 2012

My Angel, My Muse

Harmony Post Office

My Angel, My Muse
© Christy Hughes

Deep in the night when you lie in your bed
wondering at shadows up over your head
and you pull those soft white sheets to your eyes
do you whisper to God and ask Him why?

Why is she gone and why did she go?
you want to know and you want Him to show
you a reason. So pray as fast as you can.
But unanswered prayers are a part of the Plan.

But when you ask why and your eyes start to cry
and you feel so sad that you think you might die,
listen. Because He will tell you. And cherubs' wings
hug and hold you snug as they sing

a song so sweet like sirens of lore
as you slip into dreams of what was before.

Sombreuil Climbing Tea Rose

And then you will see her far away in her bed
where she has the covers pulled up over her head
and she's asking God why as her eyes fill with tears
and she shakes with the fears that nobody hears her
when she asks why and her eyes start to cry
and she feels so lonely she thinks she might die,
she listens. And He tells her. And angels' wings
hug and hold her snug as they sing

a song so sweet like sirens of lore
as she slips into dreams of what was before.

And she sees the little girl far away in her bed
with the covers pulled up around her head
and she smiles through the pain
when He answers 'you will be together again.'


Source: My Angel, My Muse, Mother Death Poem http://www.familyfriendpoems.com/poem/my-angel-my-muse#ixzz2C6EQrbbC 
www.FamilyFriendPoems.com 


White Mushroom

Some things are too painful and traumatic to put to your own words; a poem is all that will suffice. Thanks for reading and for all your comments.